How To Bend Conduit & Pipe with a Bender
Tools & Supplies You Need
When forming conduit, you need:
-
Level
-
Writing utensil
-
Tape measure
-
Conduit
-
Bender (The bender needs to be the correct size in relation to the diameter of the pipes used—generally 3/4 or 1/2 inch, though other sizes are available.)
When you use a bender with indicators and degree markers - like this one from Klein Tools - making a 30, 60, or 90 degree bend is simple. When making off-set, back-to-back, stub-ups or saddle bends, using a bender with a degree scale and multiplier scale helps save you time and energy.
Basic Steps for Bending Conduit
The basic process for bending conduit consists of:
Making 90 Degree (“L”) Stub Up Bends
A Stub Up or “L” conduit bend is kind of bend that creates a vertical bend in conduit that is in an “L” shape.
-
Decide the overall free end height you want once the bend is made
-
Calculate the stub height by using the free end height and subtract the stub adjustment (from Bender Take Up Table below)
 90 DEGREE STUB UP BEND - TAKE UP TABLE
CONDUIT SIZE STUB ADJUSTMENT 1/2" EMT 5" 3/4" EMT 6" 1" EMT 8" 1-1/4" EMT 11" 1/2" RIGID 6" 3/4" RIGID 8" 1" RIGID 11"
-
Mark the stub height that you calculated in step 2 from the “up” free end of the conduit.
 Example: ½” EMT Conduit with Free End Height of 10”10 (free end height) – 5 (adjustment from table) = 5” (stub height)
-
Place the conduit on the ground, then attach the bender with the hook pointed toward the “up” free end. Line up the start point symbol on the bender (often an arrow) with the line you made in step 3.

-
Apply pressure to the heel end of the bender with your foot, using the handle as a lever, until you reach the 90 degree position.

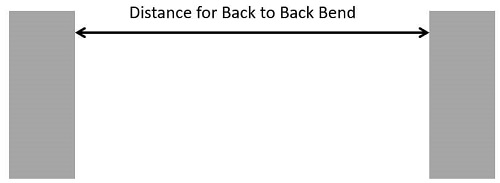
Making Back-to-Back Bends
A Back-to-Back conduit bend is kind of bend that involves making 2 close bends in opposite directions, and results in a “U” shape in the conduit.
-
Measure the distance between the objects (often walls or joists) where the back to back bend will need to fit.
-
For the first bend, follow the 90 Degree Stub Up bend direction from above.
-
Starting from the BACK of the bend, measure the distance calculated in step 1 and mark the conduit.

-
Place the bender on the conduit facing the free end that is opposite the original bend you made in step 2. Line up the mark from step 3 with the start point symbol on the bender.

-
Apply pressure to the heel end of the bender with your foot, using the handle as a lever, until you reach the 90 degree position. Be sure to keep the new bend on the same plain as the original bend to keep the two legs in the desired shape. Only minimal adjustments can be made to get the legs back on the same plane.

Making Offset Bends
An Offset conduit bend is kind of bend that changes the direction of the conduit at an angle, while keeping a consistent distance to a wall, ceiling or other surface. Basically, it allows you to run your conduit around an obstacle that is in the conduit path.
-
Measure the height needed to clear the obstacle and distance needed to clear the obstacle.

-
Determine the angle you will need to fit your installation, then use the Offset Formula Table (below) to calculate where to mark your conduit.
OFFSET FORMULA TABLE ANGLE OF BEND CONSTANTS MULTIPLIER SHRINK per INCH of OFFSET 10º x 10º 6 1/16 = .063 22-1/2º x 22-1/2º 2.6 3/16 = .188 30º x 30º 2.0 1/4 = .250 45º x 15º 1.4 3/8 = .375 60º x 60º 1.2 1/2 = .500
-
Calculate where to place your first mark on the conduit using these formulas:
(Offset Distance) X (Shrink/Inch) = Total Shrink (Total Shrink) + (Distance to Obstacle) = First Mark Measurement
Example: 45 bend, offset distance of obstacle is 5”, distance to obstacle is 16”, 5 (Offset Distance) X .375 (Shrink/Inch) = 1.875 1.875 (Total Shrink) + 16 (Distance to Obstacle) = 17.875 (First Mark)
-
Calculate how far to place your second mark from the first mark using this formula:
(Offset Distance) X (Constance Multiplier) = Second Mark Measurement
Example: 45 degree bend, offset distance of obstacle is 5”, distance to obstacle is 16” 5 (Offset Distance) X 1.4 (Constance Multiplier) = 7 (Second Mark)
-
Place the bender on the conduit and line up the start point symbol with the first mark on the conduit.
-
Keep the conduit flat, using foot pressure to roll up the conduit to the 45 degree angle mark on the bender.

-
Flip the bender and conduit (keep them together) until the bender’s handle is on the floor and the conduit is balanced in the air.
-
Rotate the conduit 180 degrees in the bender cradle and slide the conduit to line up the bender’s start point symbol with your second mark.

-
Reinforce the handle on the ground so it won’t slip, then apply force to the conduit for an air bend. Be sure to keep the second bend in the same plane as the first bend so the conduit can lay flat when installed.
Bending Tips
- You can either calculate the markings using a tape measure or you can lay the conduit directly in the appropriated area and mark the measurements based on the physical structure itself.
- Make measurements using the back of the bend as the starting point and do secondary measurements from that point.
- Make sure to use proper hand placement with the bender to keep your pipe from rolling or slipping while in the bender.
- Symbols on the bender are used to indicate the beginning and back of the bend. Depending on the type of bend you are completing, you need to align the curve with the correct symbol and match the top of the pipe with the correct degree marker.
- A bender uses your foot pressure to make the bend. While bending, apply steady, firm pressure to the foot hold to ensure the bend stays true.
- Apply steady, gradual pressure when making the bends to avoid kinking the conduit.
- If the curve in your pipe is not at the correct angle, just place it back in the bender and adjust the bend. When your measurements are all correct, the conduit will fit securely in the space in which it is to be installed.
- If you have sharp edges on your cuts, use a metal file or sandpaper to smooth them do you don’t cut your hands.
- As always, wear protective gear to prevent injury.
Practice Makes Perfect
It may take some practice before you are able to bend conduit without having to fix the degree. Make sure your initial measurements are correct. If you need to, measure twice; that way you won’t have too many scrap pieces in the end due to incorrect calculations. When you are first learning how to bend conduit, it's a slow and steady process. So take your time, this is not meant to be a rush job.
Contact us for more information regarding handheld bending tools from Klein and Rack-A-Tiers.
Other Articles You Might Enjoy:
Choosing the Right Pipe for Underground Utility Applications